My Career by the years


MY CAREER AS A MECHANICAL MAINTENANCE ENGINEER
(**Please scroll down to view all pics.**)

This first collection of pictures is from approx. 29 years ago when I first came to SA and was employed at Shell Bitumen which was (renamed) Spraypave and then Pioneer Road Services. This company still exists today and trades as Fulton Hogan.
I initially started here as a Mechanical Field Fitter, following the road building crews all over the State for anything from 2 days away to 3 months in the remote outback, including up in the Territory, maintaining & carrying out all mechanical & structural repairs as necessary on all the trucks, plant and equipment so as to keep the 'show on the road' as they say.

These years spent in the outback were a pivotal time in my career. Being removed / so far away from all forms of support, forces you to think outside the box, improvise, work practically & logically and effect repairs that you would perhaps not encounter in a traditional workshop environment. (For example: One of our aggregate loaders sheared the main shaft in the gearbox around 4pm in the middle of a stockpile 65 K's East of Kimba which resulted in me having to remove the gearbox where the truck broke down. This particular day was 46 degrees & the truck stopped in 6 inches of bulldust.....you can just imagine the "pleasantness" of removing a gearbox in this environment !- I did achieve success though by working throughout the night & had the truck up & running by 9am the next morning). I relished this time as a great opportunity and was eventually promoted and moved back into the workshop based back in town. It was also around this time (The early 90's) that I returned to night (Trade) school to gain my second trade qualifications in Hydraulics & pneumatics so as to facilitate my growing interest in this field.

The next group of pics. are from my time at Pavequip. This company worked in close conjunction with Air-Ride Transport Engineers.
We redesigned the first hydrostatic road roller that I rebuilt whilst at Shell Bitumen and it was a great success. Along with this, we also redesigned the aggregate loader to incorporate a (Malco) screen deck in place of the industry standard trommel.

The last group of pics highlight some of my interesting & challenging tasks whilst I was self employed. Some of these pics are from my time at MSP Group (Fastfab Steel) where I reveled in the challenge of all their building, plant & equipment mechanical repairs, maintenance & upkeep inc. new fabrications.

Monday, 30 May 2011

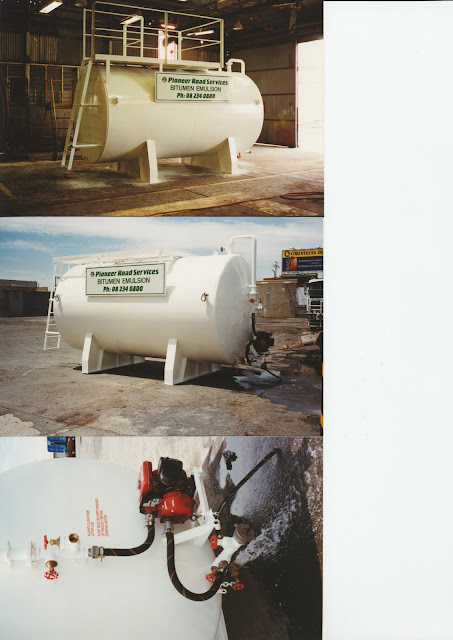
I built & delivered this static emulsion (Cold bitumen) storage tank to the Crystal Brook council. I set the pump up so that it could both self load and unload the tank.
I completely rebuilt this bitumen trailer from the wreck it once was (Top pics.). It was re-insulated and both axles replaced and roll over combing added. The finishing touch was the mirror finish stainless steel lagging.
I was given the task of re-building this 45,000Ltr Bitumen kettle after our kettle was (accidently !) blown up by one of our guys right in the middle of busy season. I had to have this one on the road ASAP- it had been parked up in our Darwin depot for the past 14 years !! From the wreck you see above to the completely re-furbished kettle took me just 8 days!! I had tradesmen working around the clock (24 Hrs a day, inc. night shifts!) on this to achieve this time frame. It was a total feat of organization to co-ordinate all the different trades to work in unison & make this happen.
Advertising brochure for the multi-tyred road roller that I re-manufactured at Pavequip. I displayed this roller up at tradequip- a major civil Engineering show at Sydney & (just coincidently??) Ingersol Rand had a commercial machine utilizing a drive system identical to mine on the market 9 months after this roller was on display at Sydney...... This drive system is now the industry standard.
Mobile screen deck aggregate loader that I designed and built for Shepparton council in Vic. Again this was the first time that an aggregate loader was offered with a vibrating screen deck (Rather than the standard trommel that was the industry norm.). This truck/plant is what I had to remove the gearbox from over at Kimba as described above !  (p.s. If you squint really hard you can see me operating the loader in the top pic !)
Bitumen tankers & trailers incorporating internal manifolds and pumps built to my design specs.
 Advertising brochure for my company A.F.E. Adelaide Fitting & Engineering
My mobile workshop/van. Adelaide Fitting & Engineering- A.F.E.
 Picture of a completely un-servicable yard trolley. The frame was quite servicable, so I re-built the undercarriage/wheels to save the client some money. There was 14 of these trolleys that I retro-fitted new undercarriages to. Re-using their existing frames saved them considerable money from their budget.

Sunday, 29 May 2011

 After pic showing completely reworked undercarriage & new solid wheels. Frame was fine and will last for another 20 years. I fitted full side plates over the center wheels to offer more mechanical protection to the wheels from forklift knocks etc.

Saturday, 28 May 2011

 Trolley finished and painted ready to be put back into service for many more years.

Friday, 27 May 2011

This is a before shot of the twist in a concrete truck chassis which had been rolled over. You can clearly see the twist from the L/H/S chassis rail compared to the R/H/S rail (There was 80mm difference between the two rails !). I was charged with straightening this all out and repairing it all to a serviceable unit again.
 This is a pic. showing the twist in the rear upper horse-shoe of the bowl chassis. The force from the (Loaded) concrete bowl hitting the road when this truck rolled over manifested itself in bending & twisting both the front & rear horse-shoe frame supports & the main chassis rails. 
 After shot of the fully repaired, painted and now serviceable concrete truck chassis. A new barrel was manufactured and a new cab/chassis purchased. I ended up cutting the whole chassis free from the front & rear horseshoes and fitting complete new chassis rails. This also allowed me to de-stress & straighten the two horseshoes before re-assembly.

Thursday, 26 May 2011

 Electro-Hydraulic lifter platform for a client to lift his lawnmower down from his shed to the back lawn- also had removable hand rails installed for safety. I installed two vertical teflon strips to the front face of his garage to prevent any 'travel' damage from 'raise-lower' motions.

Wednesday, 25 May 2011

 Overhead Truss lifting gantry. This was designed to be one person remote operator controlled. The operator wore a controller around his neck which he operated with one hand- leaving his other hand to control the movements of the truss as he slowly walked it to the pack & strap rack for transport. This new lifter solved an on-going issue that the client had for many years with an old floor mounted elec./hyd. unit.

Tuesday, 24 May 2011

 Overhead gantry again, now at park/rest position against wall.

Monday, 23 May 2011

 Another view of the truss gantry inc. universal beams, lateral support and upper support spar. This Truss lifter was designed and fitted in place around existing infrastructure.

Sunday, 22 May 2011

 Static storage racks- We built three of these and they stood end to end.

Saturday, 21 May 2011

 I was commissioned to build these (Tender) brackets for a 72 foot long $12million boat. Complete bracket assembly's were manufactured from 316 marine grade stainless steel. All TIG welded and mirror finish polished.

Friday, 20 May 2011

 Half way into the assembly of components....Arc/radius in flat plate was achieved with plasma cutter so as to minimize distortion.

Thursday, 19 May 2011

Assembly/TIG welding of boat bracket components.

Friday, 6 May 2011

The finished products, fully adjustable to accommodate bow and stern dimensions- not too shabby if I don't say so myself !!

Thursday, 5 May 2011

 This is by far probably the most bizarre job I've completed to date (& possibly ever will !!). I was commissioned to cut the front off a Rolls Royce and mount it on a clients 'toy room' wall........

Wednesday, 4 May 2011

 Another view of the sectioned roller front. This was the difficult bit....trying to ensure that my cut was parallel with the front of the car and then figuring out how I was going to mount this to the wall.
 Sorting out the details and logistics of how I was going to do this

Tuesday, 3 May 2011

The finished product (Client had it painted gold before I effected final fitment) complete with working headlights and indicators- switched from behind the bar on other side of room of course !!

Monday, 2 May 2011

 Completed shot with some of the 'toys' pictured........
 Pugmill manufactured for a major mining client, this also had a similar size hopper assembly that fed into the pugmill with a loading conveyor. The hopper was attached to the pugmill by four bolt/ faceplates visible on the bottom of the pugmill bottom skids.
Another view of the pugmill- Discharge conveyor to the right of pic. Feed hopper & load conveyor 'butt up' to far end. The main mixer shafts were powered by a CMG 55kw motor running through a Leroy-Somer reduction gearbox and controlled by a VSD- (Variable Speed Drive). Overall control was managed by a PLC which controlled the hopper load in conveyor speed relative to the pugmill mix quantity and the pugmill output conveyor. This entire process was then (remote) controlled by the front end loader driver whilst he operated his machine keeping mix up to the hopper.
 The beginnings of a mobile slump stand. This is for a mobile concrete manufacturing plant which is assembled on major construction sites (eg. Windtowers).
 Sides mounted into trailer.....
Beginnings of the pugmill (Main body assembly), we manufactured in background.

Sunday, 1 May 2011

 Floor in, stairs being fabricated......Stringers in, working out dimensions for treads so as to comply with Aus. Standards. The whole trailer/ platform assembly was fabricated so that it could be unbolted & diss-assembled if required.
 Finished product all shiny painted. This is used to check the 'slump'- i.e.thickness/consistency of concrete. The truck backs up to it & the operator climbs the stand and safely looks down on the slump of the mix and adds water or chemical agent as necessary.
 These are decorative steel arbors that I installed at Centennial park cemetery. They were spread over four levels, two on each level. Pic. taken at footing completion stage, ready for construction of arbors.
 One level completed.....
Hmmm....the dreaded site modifications, when all doe's not go to plan....
 Assembly of the structures. Temporary wooden props that I knocked up in the foreground to facilitate construction.
 Finished product. Two on each level- Eight all up.
Finished Wisteria arbors with paving & plants all done